Laptop Screen Troubleshooting Guide
How to Fix a Stuck Pixel on a Laptop Screen
A bright red, green, blue or white dot may be a stuck pixel rather than a permanently dead pixel. This guide explains how to identify the fault, try a safe browser-based pixel exercise and decide when a screen replacement or warranty assessment may be required.
Bright coloured dot
More likely to be a stuck pixel or sub-pixel fault
Black dot
More likely to be a dead pixel or hardware fault
Avoid pressure
Do not rub, press or massage the LCD panel
First: is the pixel stuck or dead?
The terms dead pixel and stuck pixel are often used as though they mean the same thing, but the appearance and likely cause can be different.
| Fault |
What it may look like |
Chance of software helping |
| Stuck pixel |
A permanently bright white, red, green, blue, yellow, cyan or magenta dot. |
A pixel-exercising tool may help, although there is no guarantee. |
| Dead pixel |
A black dot that remains dark on a white or light background. |
Software is less likely to help because the pixel may have suffered a hardware failure. |
| Sub-pixel fault |
A tiny coloured point caused by one red, green or blue element behaving incorrectly. |
Some bright sub-pixel faults may respond to colour cycling. |
| Dust or pressure mark |
A blurred spot, shadow or mark covering more than one pixel. |
Pixel software will not repair dust, pressure damage or marks inside the LCD layers. |
Use solid colours to check
Display full-screen black, white, red, green and blue backgrounds. A stuck pixel normally stays brightly coloured while the surrounding image changes. A dead pixel normally stays black.
How laptop screen pixels create an image
A laptop display contains millions of pixels. Each full pixel normally contains red, green and blue sub-pixels. By controlling the brightness of those three colours, the display can reproduce the colours and images you see.
When one sub-pixel remains permanently active, the fault can appear as a coloured point. If the full pixel fails to light, it may appear black.
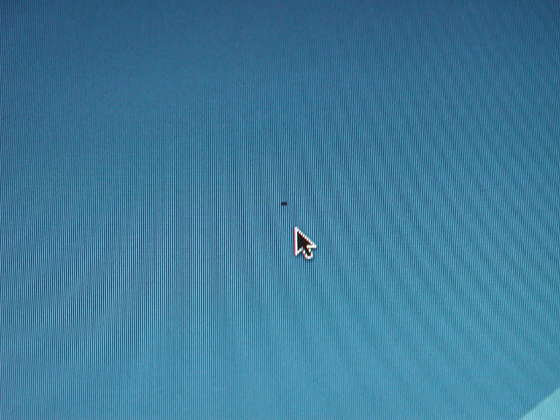 Example of visible pixel faults. The exact colour and appearance can vary depending on which pixel or sub-pixel elements are affected.
Safe method: use a browser-based pixel exercise
A pixel-exercising tool rapidly changes the colours displayed around the affected area. This may encourage a bright stuck pixel to begin responding normally again.
1
Clean the screen
Gently clean the display with a suitable microfibre cloth so that dust is not mistaken for a pixel fault.
2
Locate the pixel
Use a black or dark background to find bright pixels and a white background to find black pixels.
3
Position the fixer
Open the browser tool and place its animated repair square directly over the bright stuck pixel.
4
Leave it running
Allow it to run for at least ten minutes, then display solid colours again to see whether the fault has changed.
Recommended browser tool
JScreenFix runs directly in a modern web browser and does not require a Java installation or a software download.
Open JScreenFix
If there is no improvement, you can try another session later. Do not assume that running it for hours will guarantee a repair.
Do not press, rub or massage the screen
Older pixel-repair advice sometimes recommends pressing the fault with a finger, pencil eraser or cloth. We do not recommend this.
Laptop LCD and OLED panels contain delicate layers. Localised pressure can create permanent pressure marks, damage liquid-crystal cells, disturb the diffuser layers, crack the panel or turn one small pixel fault into a much larger damaged area.
Never use these methods
Do not push the display with a pencil, pen, eraser, fingernail or hard object. Do not tap the screen, twist the lid or apply firm circular pressure over the fault.
What if the pixel does not recover?
A stuck pixel may remain unchanged after a browser-based repair attempt. A black dead pixel is even less likely to respond because it may be caused by a failed transistor, connection or pixel element inside the panel.
Newly delivered screen
Photograph the defect against solid black, white, red, green and blue backgrounds and contact the supplier before applying pressure or attempting a physical repair.
Existing laptop screen
If the fault is minor, you may decide to continue using it. If it is distracting or spreading, replacement of the complete display panel may be the practical solution.
Check the pixel policy
LCD manufacturers and suppliers normally assess pixel faults against a stated pixel-defect policy rather than treating every single anomaly as a failed panel.
Before deciding that the screen is faulty
Not every dot or mark is a failed pixel. Check the following before concluding that the display panel needs replacing.
Clean the surface
A tiny piece of dust or dried cleaning residue can look surprisingly similar to a black pixel.
Take a screenshot
If the mark appears in a screenshot viewed on another device, the issue is probably software or graphics-related rather than a physical screen pixel.
Use solid backgrounds
Test black, white, red, green and blue images to confirm whether the point stays fixed in the same physical location.
Check an external monitor
If the same artefact appears on an external display, investigate the graphics driver, GPU or operating system instead.
Look for pressure damage
A cloudy patch, rainbow mark or dark area covering several pixels is more likely to be pressure or layer damage.
Photograph the fault
Clear photographs on several solid backgrounds can help a supplier assess the type and number of visible pixel defects.
Can temperature cause a pixel to become stuck?
Pixel behaviour can sometimes appear after transport, storage or a significant temperature change. However, a visible pixel fault should not automatically be blamed on temperature, and warming, cooling or physically manipulating the screen is not a reliable repair method.
Allow a cold laptop or replacement screen to reach normal room temperature before powering it on. This also reduces the risk of condensation forming inside the device.
When is replacement the sensible option?
Replacing the display may be the practical choice when the fault is highly visible, several pixels are affected, the screen also has lines or pressure damage, or a supplier confirms that the panel meets the conditions for replacement under its pixel policy.
Try software first—but never risk damaging the panel.
A bright stuck pixel may respond to a browser-based colour-cycling tool. A black dead pixel or physical LCD-layer fault is less likely to recover. Avoid pressure-based methods and check the supplier’s pixel policy before taking further action.
Frequently asked questions
What is the difference between a stuck pixel and a dead pixel?
A stuck pixel usually appears as a bright white or coloured point that stays illuminated. A dead pixel usually appears black and does not light up correctly.
Can JScreenFix repair a dead pixel?
It is intended mainly for bright stuck pixels. A black dead pixel is more likely to be a hardware fault and is less likely to respond to colour-cycling software.
How long should I run a pixel-fixing tool?
JScreenFix recommends positioning the repair square over the affected pixel and leaving it running for at least ten minutes. Improvement is not guaranteed.
Should I massage a stuck pixel?
No. Pressing or rubbing a modern laptop screen can damage the LCD or OLED layers, create pressure marks or crack the panel.
Can a pixel fault spread?
A single failed pixel does not normally spread like a crack. However, additional faults can appear if the panel has pressure damage, electrical damage or another developing hardware problem.
Does one pixel fault mean the screen is covered by warranty?
Not necessarily. Screen manufacturers and suppliers normally apply a pixel-defect policy based on the number, type and location of visible faults. Check the applicable warranty and pixel policy.
How do I prove that a pixel is faulty?
Photograph the display showing solid black, white, red, green and blue backgrounds. Keep the camera focused and avoid reflections so the fault can be clearly assessed.
