Replacing a broken Apple Macbook Air screen
Have you broken your Apple Macbook Air screen? If so, there's no need to worry. Below, you'll find easy to follow instructions that will help guide you through the entire screen replacement process.
How to replace an Apple Macbook Air screen: a step by step guide
Step one
Before you do anything else, turn off your Macbook and remove the battery. You should also check to make sure that you have unplugged any, (and all,) peripheral devices, (eg. speakers/memory sticks.) It's also always a good idea to back up any important data, (using an online platform, or an external device,) before beginning any repair.
Step two
Apply heat to each edge of the front bezel using a professional heat gun or a hairdryer; the heat should loosen the adhesive used to hold the bezel in place. Remember not to hold the heat gun or hairdryer in the same place for too long, as, this could permanently damage your machine.

Step three
As you heat the edges of the front bezel, carefully begin to prise it away from the rest of the screen casing, using your fingers or a flat edged tool,( a plectrum or razor.) Remember, there's no need to rush: take your time when removing the front bezel, (pausing to apply heat; to help, if necessary,) so as to avoid snapping or bending it. When you are sure that you have sufficiently loosened the front bezel, lift it free from the rest of the screen casing and, safely set it aside.

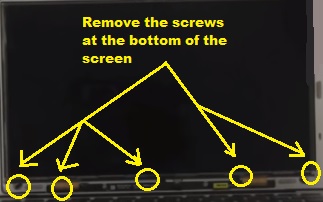
Step four
Remove the screws, (five in total,) for the bottom of the broken Macbook Air screen, (peeling back any strips of tape used to cover them, if necessary.)
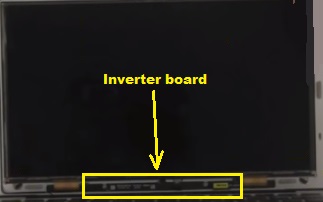
Step five
Remove the screws, (two in total,) used to hold the long strip of electronics at the bottom of the screen, (the inverter,) in place.
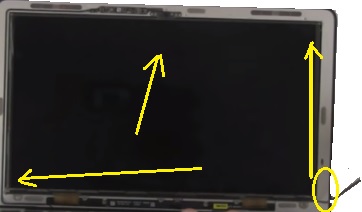
Step six
Carefully start to prise the broken Macbook Air screen out of the frame in which it sits, (applying heat to each edge of the screen to help loosen the adhesive.) Take care, when completing this step, so as not to damage the screen, (or the materials sitting underneath it,) as , any damage will be visible when your replacement screen in installed.
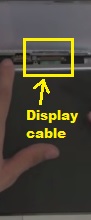
Step seven
Stand your Macbook upright and, pull the broken screen towards you; laying it to rest, face down, in the laptop keyboard. On the back of the broken screen,(at the very bottom,) you should see two cables attached. Disconnect each of these cables. Next, take hold of the black inverter (the strip of of electronics at the bottom of the screen,) and gently pull it towards you. Sitting behind the inverter, you should see a further cable running toward the screen itself. Disconnect this cable also.
Step eight
Remove the broken Macbook screen from your machine. Before fitting your replacement screen, check to makes rue that there ar eno smudges or marks on the layers that sit underneath the scree as, these defects will be noticeable when you fit your new screen.
Step nine
To fit your replacement Apple Macbook Air screen, simply complete the instructions, (outlined above,) in reverse order.
Replacement Macbook Air screens
*Disclaimer: As with any repair you choose to undertake, Laptop-LCD-Screen.co.uk cannot be held responsible for any damage caused to your device during the replacement/repair process. If you feel anxious or unsure about completing this repair yourself, it is best to err on the side of caution.
