Laptop Touchscreen Buying and Installation Guide
Laptop Screen Assemblies, Digitizers and Gorilla Glass: Removal Guide
Modern touch laptops often have no separate plastic bezel. Instead, the black border, touch digitizer and protective front glass may form one bonded display assembly. This guide explains what each part does, which component to buy, and how controlled moving heat can release the assembly from the rear lid without creating damaging hot spots.
Written by:
Nick Christou, Laptop Screen Technical Specialist
Technical review:
19 July 2026
Experience:
Laptop screen specialists since 2006
Quick answer
Why these screens are harder to replace
✓
The glass front often replaces the removable plastic bezel.
The complete glass, touch and LCD or OLED assembly is normally adhered around the edge of the rear lid. Heat softens that perimeter adhesive so a plastic pry tool, spudger—sometimes called a spludger—or an expired debit card can be worked into the gap. The assembly is then released gradually by alternating moving heat with shallow plastic separation around the perimeter.
This is generally more difficult than replacing a normal laptop panel behind a clipped plastic bezel. There may be strong adhesive, fragile glass, touch cables, webcam wiring and a narrow painted border with very little room for tools.
Know what you are removing
LCD, digitizer, Gorilla Glass and display assembly explained
These names are often used as though they mean the same thing, but they describe different parts.
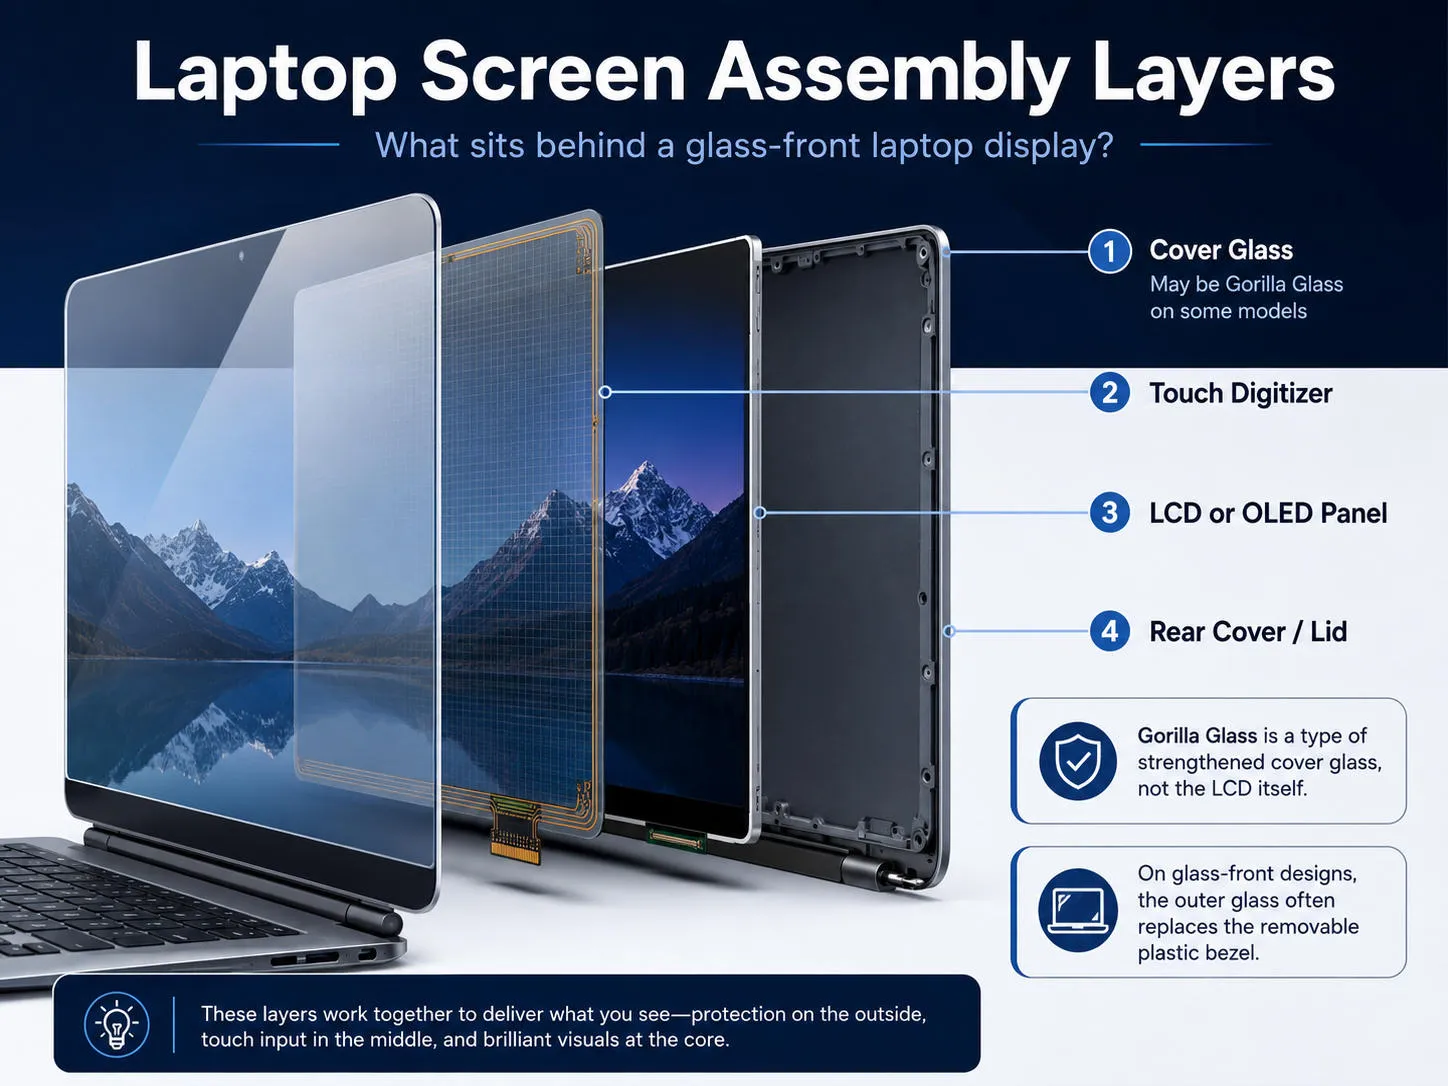 Laptop screen assembly layers:
the protective cover glass sits in front of the touch digitizer and LCD or OLED panel, with the rear lid supporting the complete assembly. Gorilla Glass describes the strengthened cover glass, not the picture-producing panel.
Laptop screen assembly layers:
the protective cover glass sits in front of the touch digitizer and LCD or OLED panel, with the rear lid supporting the complete assembly. Gorilla Glass describes the strengthened cover glass, not the picture-producing panel.
Cover glass
The outer surface you touch. It protects the display and may have the black border, webcam opening and manufacturer logo printed onto it.
Gorilla Glass
A brand of chemically strengthened cover glass made by Corning. It is the protective exterior glass—not the LCD image-producing layer and not automatically the touch sensor.
Touch digitizer
The touch-sensitive layer that detects finger or pen input. It may be attached to the front glass, bonded to the LCD, or integrated into the screen panel.
LCD or OLED panel
The component that produces the picture. A panel can be supplied alone, with integrated touch, or as part of a bonded assembly.
Display assembly
A combined replacement that can include the cover glass, digitizer, LCD or OLED, frame, adhesive and sometimes the rear cover, webcam, hinges or cables.
For a deeper buying explanation, read
what “No Digitizer” means on a laptop screen
and our guide to
on-cell touch screens versus separate digitizers
.
Four common designs
Which laptop screen construction do you have?
01
LCD behind a removable plastic bezel
The easiest type. The bezel clips off, the panel is screwed or taped into the lid, and the original bezel is reused.
02
LCD behind separate digitizer glass
The glass front provides touch and may also provide the finished black border. The LCD and glass might be separately replaceable—or permanently bonded.
03
Bonded glass, touch and display assembly
The glass, digitizer and LCD or OLED are supplied as one part. Remove the complete assembly from the rear cover rather than separating its internal layers.
04
Complete lid or top-cover assembly
The safest replacement may include the display, glass, rear cover, hinges, webcam and cables. This avoids transferring bonded or damaged parts.
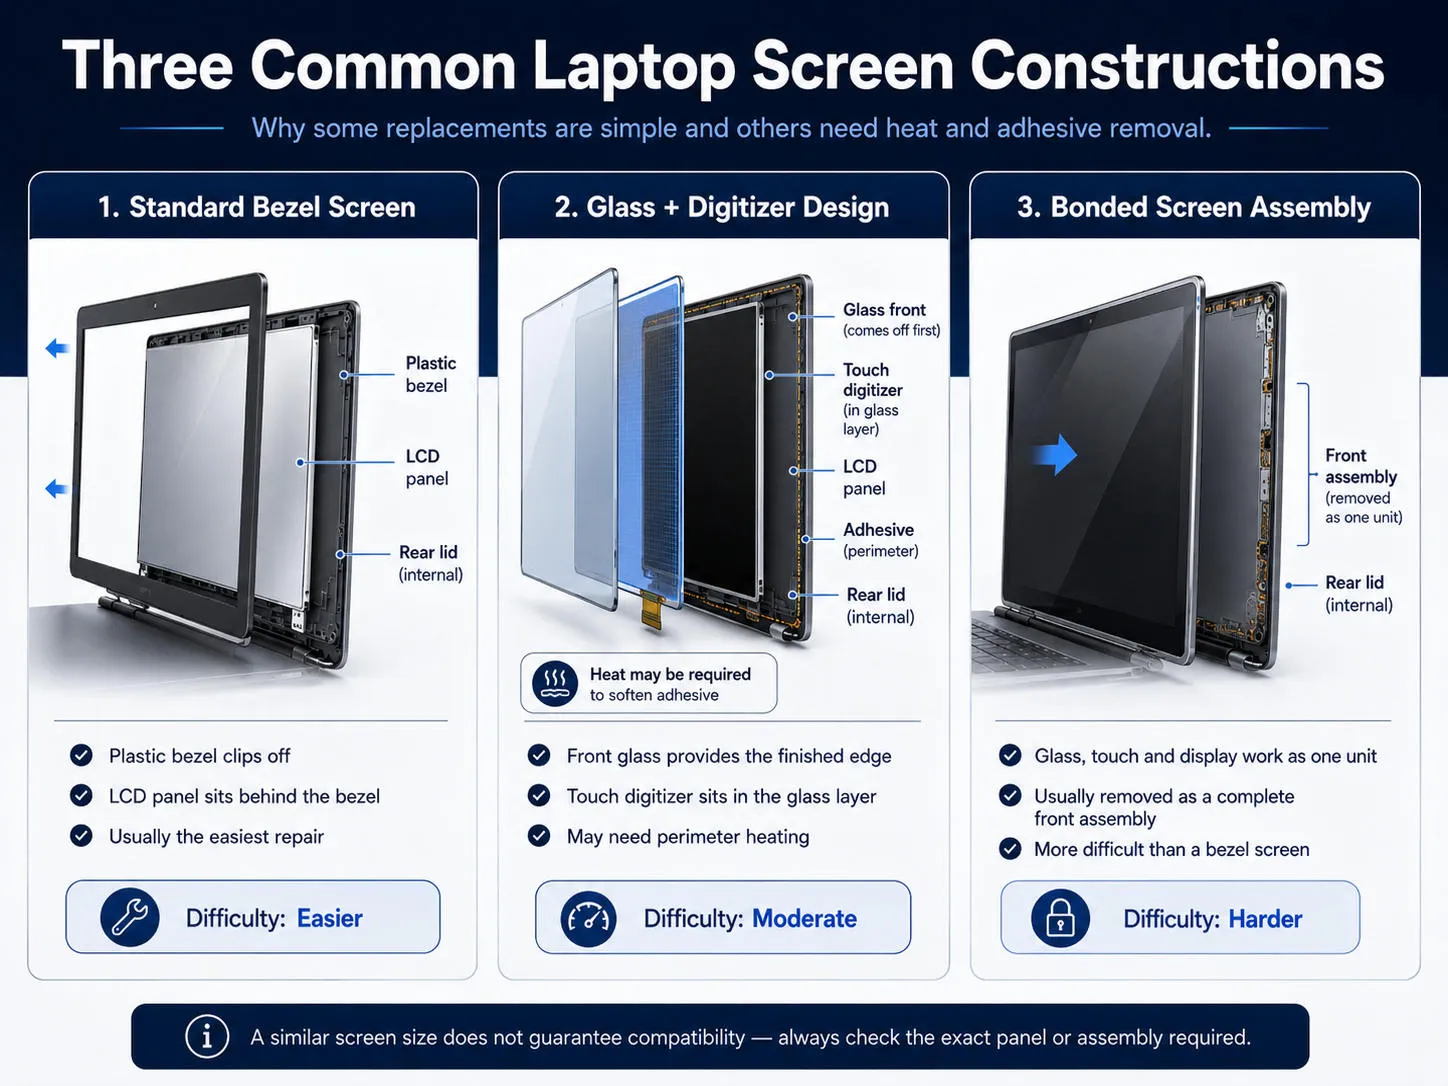 Three common screen constructions:
a removable plastic bezel is normally the easiest design to service; glass-and-digitizer systems may require perimeter heat; and bonded front assemblies are usually removed from the rear lid as one complete unit.
Three common screen constructions:
a removable plastic bezel is normally the easiest design to service; glass-and-digitizer systems may require perimeter heat; and bonded front assemblies are usually removed from the rear lid as one complete unit.
i
No visible plastic bezel does not always mean the same construction
Some designs have a glass front bonded only around the edge of the lid. Others have the digitizer optically bonded directly to the LCD or OLED. Identify the exact replacement part before applying heat or inserting a tool.
Controlled heat
What temperature should you use with a heat gun?
Measure the temperature at the glass border, not the temperature shown on the heat gun. Even a low heat-gun setting can produce air that is far hotter than the surface requires.
| Measured surface temperature |
How to use it |
Important note |
| 50–60°C |
Initial warming and a cautious starting point around thin plastic edges. |
The adhesive may remain firm, but this allows you to check how the lid and glass react. |
| 60–70°C |
The normal starting range for softening perimeter display adhesive. |
Use short moving passes and test the edge with a plastic tool rather than forcing it. |
| 70–80°C |
For stubborn sections that have not released at the lower temperature. |
Use locally and briefly. Protect webcam plastics, cables and the display electronics. |
| Above 80°C |
Avoid as a general laptop-display procedure unless the manufacturer provides a specific service method. |
OLED panels are particularly heat-sensitive. Treat 80°C as the practical ceiling for a general guide. |
!
The gun setting is not the glass temperature
Use the lowest airflow and heat that soften the adhesive. Hold the nozzle roughly 5–8 cm from the surface, keep it moving continuously and check the black border with an infrared thermometer or suitable temperature probe. Never hold the gun stationary over one point.
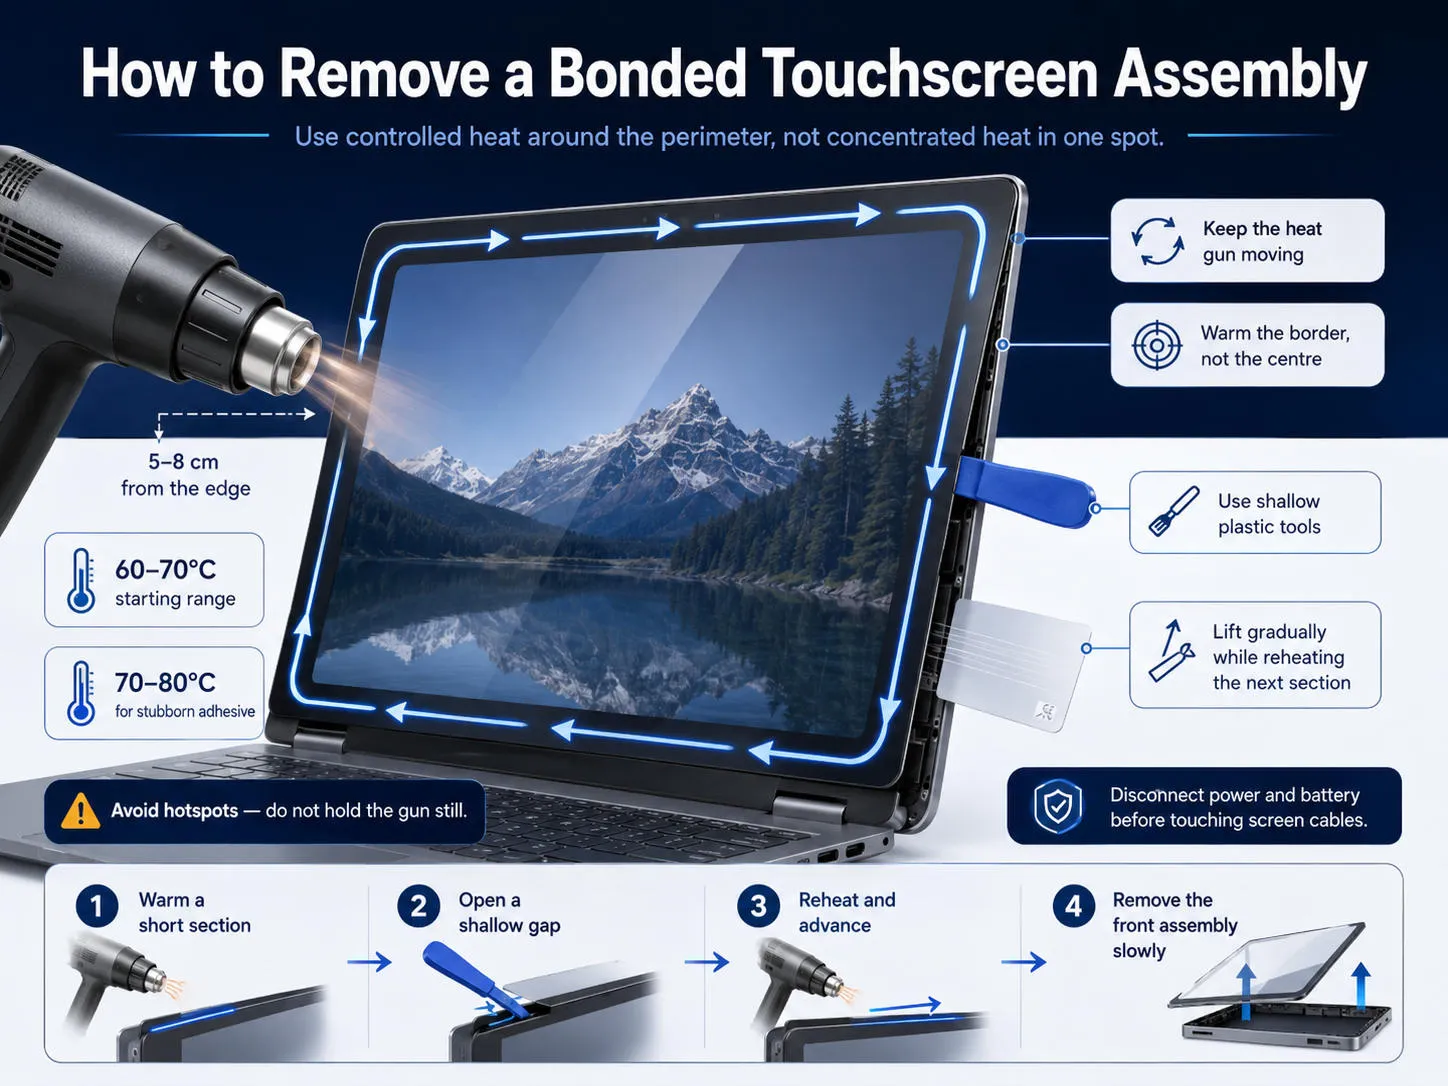 Moving perimeter heat:
warm a short section of the black border, open a shallow gap with a plastic pick, then reheat and advance. Keep the heat gun moving and lift the front assembly gradually rather than forcing cold adhesive.
Moving perimeter heat:
warm a short section of the black border, open a shallow gap with a plastic pick, then reheat and advance. Keep the heat gun moving and lift the front assembly gradually rather than forcing cold adhesive.
Warm a short edge
Use smooth overlapping passes around one section of the perimeter.
→
Test the adhesive
Use a suction cup and plastic pick without forcing the glass.
→
Repeat and advance
Reheat only the next stubborn section and work around the edge.
The goal is not to heat the whole computer until it is extremely hot. The goal is to soften a narrow band of adhesive immediately ahead of the plastic tool.
Preparation
×
Disconnect the charger and battery first
Do not remove or reconnect an eDP, LVDS or touch connector while power is present. Where the internal battery cannot be disconnected immediately, reduce its charge before dismantling and follow the laptop’s service procedure.
Step-by-step removal
How to remove a bonded laptop touchscreen assembly
These are general principles. Cable positions, opening direction and adhesive layout vary by laptop model.
Confirm that you are removing the correct unit
Check whether the replacement is glass only, digitizer only, LCD or OLED only, a bonded front assembly, or a complete lid. If the replacement arrives as glass and display together, plan to remove the old unit from the rear cover as one piece.
Power down and expose the display connections
Shut down the laptop, disconnect the charger and isolate the battery. Remove any base, hinge or lid parts required to reach the screen and touch cables. Photograph the routing before disconnecting anything.
Stabilise cracked glass
Wear safety glasses and gloves. Place strips of low-tack tape across badly cracked glass so loose fragments remain controlled. Do not cover openings in a way that hides screws or the edge you need to heat.
Choose a safe starting edge
Identify the webcam, microphone, touch flex and display cable positions. Begin where the service information or physical inspection shows there is room for a shallow plastic tool. Do not assume every model opens from the same side.
Warm the first short section of the perimeter
Start around 60°C at the glass surface. Keep the heat gun moving in overlapping passes and direct heat mainly at the painted border where the adhesive normally sits. Avoid concentrating heat in the centre of the LCD or OLED.
Create the first gap with controlled lifting force
Use a suction cup to lift gently while introducing a thin plastic pick into the softened edge. Insert only far enough to separate the perimeter adhesive. A deep tool can cut a flex cable, scratch the LCD or damage the webcam.
Work heat and plastic tools around the border
Leave a pick in the opened gap so the adhesive cannot reseal. Warm the next short section, slide another pick or flexible card through the adhesive, then advance gradually. Alternate heat and separation rather than trying to pull the whole assembly free at once.
Use extra care at corners and cable areas
Corners often contain thicker adhesive and are easy to crack. The top border may contain webcam or microphone wiring, while the lower edge can sit close to the display circuit board and connector. Reheat stubborn adhesive instead of increasing force.
Lift the released assembly slowly
Once all four edges are free, open the assembly only far enough to inspect the rear. Do not pull it away from the lid because the display and touch cables may still be attached. Support the glass as you disconnect each cable and release any retaining tape or locks.
Remove the front glass and display as one unit when bonded
If the LCD or OLED, digitizer and glass are bonded together, the whole front assembly should now come away from the rear cover. Separating the glass from the display itself is a different specialist process involving optical adhesive removal, cleaning, alignment and rebonding.
i
Replacing the broken screen means you do not need to preserve its picture
A few additional cracks or display marks in the old assembly may not matter when it is being discarded. You must still control glass fragments and avoid damaging the rear cover, hinges, webcam, antennas, cables, motherboard and battery.
Important distinction
Removing an assembly from the lid is not the same as separating the digitizer from the LCD
Reasonable DIY task
Removing a complete bonded glass-and-display assembly from the rear cover using controlled perimeter heat and model-specific cable handling.
Advanced repair
Removing a separate digitizer that is attached only around its perimeter while preserving a known-good LCD underneath.
Specialist equipment normally required
Separating optically bonded glass from an LCD or OLED, then removing OCA or LOCA residue and rebonding without dust, bubbles or alignment defects.
When the picture, touch and glass are all damaged—or when the layers are optically bonded—the complete assembly is normally the safest purchase. A cheaper panel marked
“No Digitizer”
will not complete that repair.
About the cover glass
Does Gorilla Glass change the removal method?
Gorilla Glass is chemically strengthened cover glass designed to be thin, damage-resistant and suitable for touch devices. It is stronger than ordinary untreated glass, but it is not unbreakable and does not make the adhesive easier to remove.
The heat is applied to soften the adhesive beneath the glass border—not to change the glass itself. A cracked Gorilla Glass front can still splinter, and a previously damaged edge may break suddenly when lifted.
Read our existing background articles:
Laptops and Tablets with Gorilla Glass
and
Gorilla Glass: Thinner and Stronger Laptop Display Technology
.
Installation
How to prepare and install the replacement assembly
-
Remove the old adhesive.
Use a plastic scraper and a small amount of electronics-safe adhesive remover or high-purity isopropyl alcohol on the metal or plastic bonding surface. Keep solvents away from display coatings, labels and unsealed panel edges.
-
Dry-fit the replacement.
Confirm the overall size, corner shape, webcam opening, border, cable positions and connector types before applying adhesive.
-
Connect and test before sealing.
Connect the display and touch cables, reconnect power only when every connector is fully seated, then test the picture, brightness, touch, pen and camera.
-
Power down and isolate the battery again.
Do this before final adhesive installation.
-
Use the correct pre-cut adhesive.
Apply it to the clean rear-cover frame without stretching or overlapping it. Household tape and general-purpose glue can create uneven pressure and make future removal difficult.
-
Align before pressing.
Use the webcam opening, corners and lid edges as references. Once the adhesive touches firmly, repositioning may damage the new assembly.
-
Apply even perimeter pressure.
Press over the bonded border, not the active display area. Follow any curing or clamping time specified for the adhesive.
This perimeter adhesive is different from the
stretch-release tape used behind many no-tabs narrow-border LCD panels
.
Avoid expensive damage
Common heat-gun and touchscreen-removal mistakes
Holding the gun still
Stationary heat creates hot spots that can distort the lid, damage polarising films or overheat OLED material.
Using the gun dial as the surface reading
The outgoing air can be far hotter than the glass. Measure the actual border temperature.
Forcing cold adhesive
When the pick stops, reheat that section. Extra leverage can crack glass or bend the rear cover.
Inserting a tool too deeply
A deep pick can cut touch, camera or display wiring and can scratch the LCD underneath separate glass.
Pulling the assembly away suddenly
The screen may be loose around the edge but still attached by short flex cables.
Buying LCD only for broken front glass
A panel-only replacement cannot replace a cracked digitizer or glass-front bezel.
Separating optically bonded layers manually
This commonly leaves a damaged LCD, adhesive residue, dust, bubbles and alignment problems.
Sealing before testing
Always test the image, touch and camera before applying the final adhesive bond.
Buying decision
Which replacement part should you order?
| Damage or construction |
Likely part required |
Check before ordering |
| Perfect picture, cracked front glass, separate digitizer confirmed |
Digitizer or front glass for the exact model |
Whether the glass is genuinely separable and whether touch electronics are included. |
| Lines, black patches or broken picture behind undamaged reusable glass |
LCD or OLED panel only may be suitable |
Whether the digitizer is reusable and not optically bonded to the damaged display. |
| Glass, touch and picture damaged |
Complete bonded display assembly |
Frame, border, connector, webcam opening, touch cable and lid compatibility. |
| Rear cover, hinges or webcam area also damaged |
Complete lid or top-cover assembly |
Included cables, hinges, antennas, webcam and colour of the rear cover. |
| Touch is integrated into the panel |
Correct on-cell or in-cell touch panel |
Full panel model, connector, resolution, mounting, firmware and touch specification. |
Use the
Laptop Screen Compatibility Guide
before ordering. A matching diagonal size is not enough for a bonded assembly.
Choose the complete repair part
Find the correct laptop screen or touchscreen assembly
Search by the full laptop model, manufacturer part number or original display code. Check whether the listing includes the LCD or OLED, digitizer glass, frame, bezel and rear-cover parts required for your repair.
Frequently asked questions
Screen assembly, digitizer and heat-gun questions
What temperature should I use to remove a laptop touchscreen assembly?
Start at approximately 60°C at the glass border and increase gradually only when the adhesive remains firm. Most work should remain within about 60–80°C. Treat 80°C as the practical upper limit for a general guide, particularly around OLED displays.
How far should the heat gun be from the glass?
Roughly 5–8 cm is a useful starting distance on a low setting. The correct distance depends on the gun, airflow and nozzle, so measure the glass-border temperature and keep the gun moving continuously.
Can I use a hair dryer instead of a heat gun?
Yes. Many home repairers use a hair dryer because it provides slower, less concentrated heat and is easier to control than a powerful heat gun. It may take longer to soften the adhesive, so warm one short section at a time, keep the dryer moving and test the edge repeatedly with a shallow plastic pick. If the old screen assembly is already broken, preserving its picture is less important; however, you must still avoid overheating or damaging the rear cover, webcam, cables, hinges, motherboard and battery.
Can I use a debit card to remove the glass?
An expired plastic card can help separate a long straight section after the adhesive has softened. Start the gap with a thinner plastic pick, keep the card shallow and do not push it towards cables or the active display.
Does Gorilla Glass mean the laptop has a digitizer?
No. Gorilla Glass is a protective cover-glass material. A touch digitizer may be attached to it, bonded beneath it or integrated into the display, but the Gorilla Glass name alone does not identify the touch construction.
Can I replace only the front glass when the LCD still works?
Sometimes, when the digitizer is separately available and attached only around the perimeter. When the glass is optically bonded to the LCD or OLED, separating and rebonding the layers normally requires specialist equipment.
Is it safe to damage the old screen while removing it?
The old display does not need to remain visually perfect when it is being replaced, but uncontrolled breakage creates sharp fragments and can damage cables, the rear cover, webcam, hinges or battery. Keep the glass supported and taped where necessary.
Why should the replacement be tested before applying adhesive?
Testing confirms the image, brightness, touch, pen and camera before the new assembly is permanently bonded into the lid. It also makes connector or compatibility problems easier to correct.
Are glass-front assemblies harder than ordinary bezel screens?
Usually, yes. A normal bezel often clips off and exposes screws or stretch-release strips. A glass-front assembly may require controlled heating, repeated adhesive cutting and careful management of several short flex cables.
